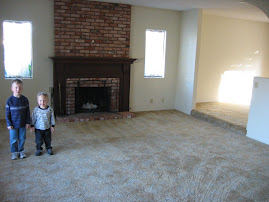
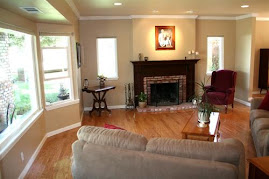
Okay, so you might be wondering about those two before and after photos on the right. The first photo is the living room of a house we bought several years ago. the carpet was old and stained and pretty gross. The windows were about 20 years old and had condensation between the panes so you could hardly see out them. The walls were full of holes. As you can see the fireplace brick went all the way up to the ceiling. Then there were the ugly, old outdated drapes on the front windows. Oh yeah, almost forgot, in an effort to make the fireplace a gas start fireplace someone had punched a hole in the side, run a pipe through it to, yep, a small propane tank outside. This was the kind of propane tank you would use for a gas B.B.Q.! Yes, the rest of the house was just as bad, if not worse. We will discuss the kitchen another time! Wait till you see those pics! Now for the updating of the living room.
The first thing to go was the carpet. Once we had that out we swept and cleaned the concrete underneath knowing it would be awhile before we got new flooring down. Then we turned our attention to reparing the walls and ceiling. This house had an intercom system through out. It didn't work and it was ugly so it had to go. Removing the box from the living room wall left a large hole to be fixed. My husband placed semi-balled up chicken wire in the hole so it was just at the back of the drywall. Then he used a thick spackling compound to fill the hole. This was done over a couple of days to ensure that it was a smooth clean surface ready to be textured. The brick of the fireplace was to overbearing so we wrapped everything above the mantle with drywall secured to small boards we mounted to the brick. We retextured all of the walls and the ceiling so that everything blended in and looked the same. The next step was to paint the walls. Because we had new texture they all had to be primed first. We then painted the walls a relaxing nuetral color called Linen by Behr. Now we were ready for the floor. For this house we used an engineered hardwood. In this case Oak. Let me tell you, as beautiful as it turned out, it was killer on the knees and back! The flooring was glued to the concrete using a wood flooring adhesive purchased at our local home improvement store. Once the flooring was in and ready to walked on we finished the room with crown molding and baseboard. These were painted and then it was time to move in the furniture! A few months later we replaced the windows throughout the house with Milgard Retrofit vinyl windows. What a difference that made! Beautiful!
Please feel free to take a look around while you are visiting my blog! Check back again as I will be discussing more of our remodel! Leave your comments and questions! I would love to hear what you have to say! Tah Tah For Now!
Subscribe to:
Post Comments (Atom)


No comments:
Post a Comment